Why Mario Cakes Are Perfect for Family Celebrations
There’s something magical about a Mario cake. Whether it’s the bright colors, the iconic characters, or the nostalgia of the 80s and 90s, these cakes bring smiles to faces young and old. For older adults, baking a Mario cake isn’t just about creating a dessert—it’s about reliving fond memories and sharing them with the next generation.
A Nostalgic Dessert for All Ages
If you grew up in the 80s or 90s, chances are you have a soft spot for Mario. The cheerful plumber from the Mushroom Kingdom was a staple of childhood for many, and his adventures on the Nintendo Entertainment System (NES) brought joy to millions. Today, Mario is more than just a video game character—he’s a cultural icon that bridges generations.
For older adults, baking a Mario cake is a chance to revisit those happy memories. It’s also a wonderful way to connect with grandchildren or younger family members who may be discovering Mario for the first time. Imagine the joy on their faces when they see a cake featuring their favorite character!
Ideal Occasions for a Mario Cake
A Mario cake isn’t just for birthdays—it’s perfect for any occasion that calls for a little fun and creativity. Here are some great ideas:
- Birthdays: Whether it’s for a grandchild, a child, or even yourself, a Mario cake is a showstopper.
- Family Game Nights: Pair the cake with a round of Mario Kart or Super Mario Bros. for a memorable evening.
- Retro-Themed Parties: Throw it back to the 80s or 90s with a Mario-themed celebration.
No matter the occasion, a Mario cake is sure to be a hit.
Simple Ingredients and Tools You Already Have
One of the best things about making a Mario cake is that it doesn’t require fancy ingredients or tools. In fact, you probably already have everything you need in your kitchen. Let’s break it down.
Easy-to-Find Ingredients
You don’t need to be a professional baker to create a Mario cake. Here’s what you’ll need:
- Basic cake ingredients: Flour, sugar, eggs, butter, and baking powder. For a classic cake recipe, check out this guide on Allrecipes
- Store-bought icing: Save time by using pre-made icing in white, red, and blue.
- Food coloring: To create Mario’s signature skin tone and other details.
- Optional: Fondant or chocolate icing for Mario’s mustache, eyebrows, and hair.
If you’re short on time, you can even use a boxed cake mix. There’s no shame in taking shortcuts—especially when the result is just as delicious!
Tools You Likely Own
You don’t need a fully stocked bakery to make a Mario cake. Here’s what you’ll need:
- Mixing bowls and spatulas: For preparing the cake batter and icing.
- 9-inch round cake pan: This is the perfect size for Mario’s face.
- Piping bags: For decorating. Don’t have piping bags? No problem! A Ziploc bag with the corner snipped off works just as well. Looking for more nostalgic cake designs? Try this vintage heart cake recipe
- Spoons and knives: For spreading icing and adding details.
With these simple tools, you’re ready to get started.
Step-by-Step Guide to a Simple Mario Cake
Now that you have your ingredients and tools, it’s time to dive into the fun part—baking and decorating your Mario cake! This method uses two 9-inch round cakes and three cupcakes to create Mario’s face, hat, and features. Don’t worry if you’re not an experienced baker. This step-by-step guide is designed to be easy to follow, even for beginners.
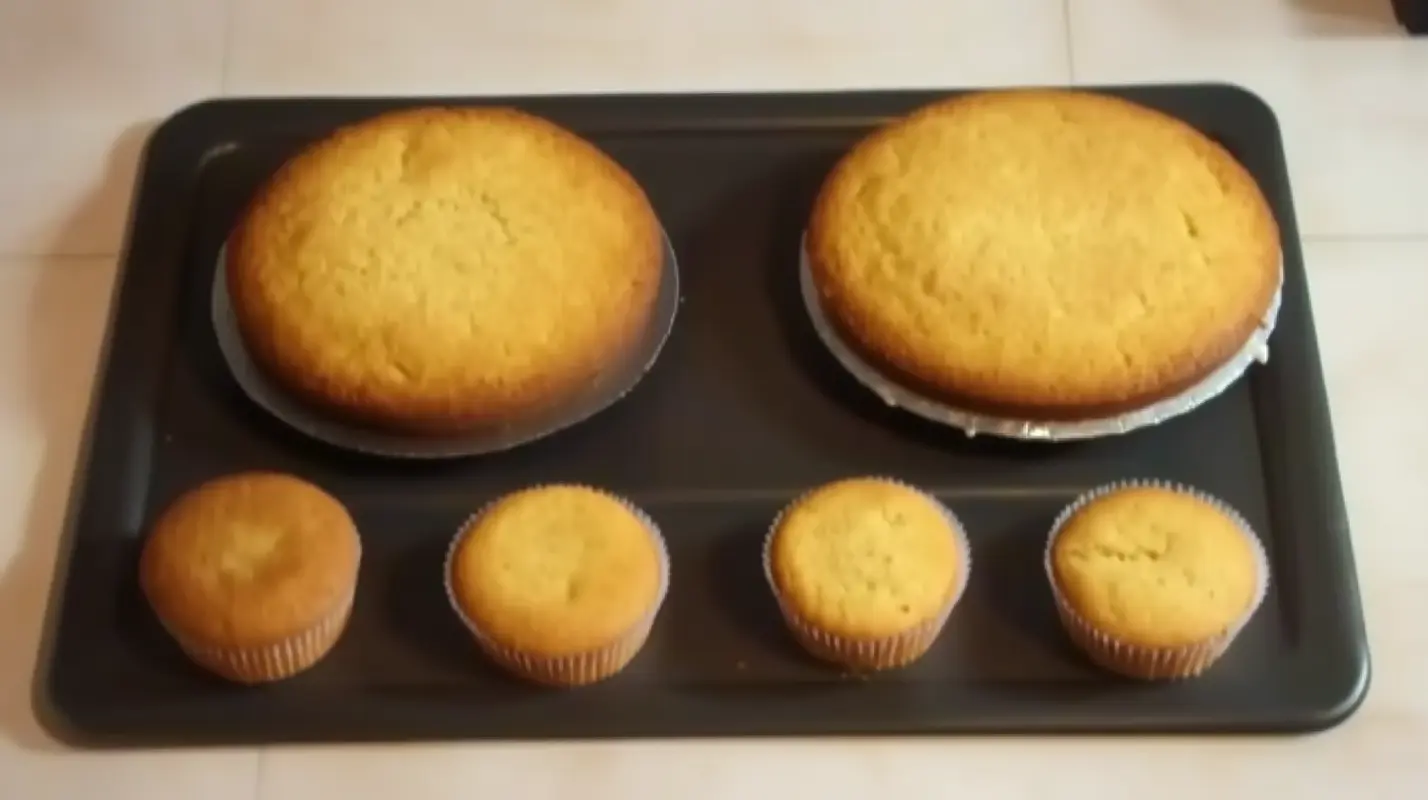
Step 1: Bake Two 9-Inch Rounds and Three Cupcakes
- Prepare the Batter:
- Use one box of Yellow Cake Mix (or your preferred flavor).
- Follow the instructions on the box to prepare the batter.
- Bake the Cakes:
- Pour the batter into two 9-inch round cake pans.
- Use the remaining batter to make three cupcakes.
- Bake according to the package instructions, or until a toothpick inserted into the center comes out clean.
- Cool Completely:
- Let the cakes and cupcakes cool completely before assembling.
Why This Works:
- One round cake will serve as the main face.
- The other round cake will be cut to form the hat.
- The cupcakes will be used to create the nose, ears, and chin.
Step 2: Build the Template for Mario’s Head and Hat
- Assemble the Face:
- Place one of the 9-inch round cakes on a serving tray or cake board. This will be the base for Mario’s face.
- Create the Nose:
- Cut the bottom off one cupcake to create a flat surface.
- Place the cupcake in the center of the round cake to form Mario’s nose.
- Add the Ears and Chin:
- Cut the remaining two cupcakes in half.
- Use these pieces to create Mario’s ears and chin. Place them on either side of the face and below the nose.
- Shape the Hat:
- Take the second 9-inch round cake and cut it into a crescent shape to form Mario’s hat.
- If you want a taller hat, you can stack additional pieces of cake.
Pro Tip: Use a toothpick to lightly sketch the placement of the nose, ears, and chin before attaching them. This will help ensure everything is symmetrical.
Step 3: Make Skin Tone Icing
- Prepare the Icing:
- Start with store-bought white icing to save time.
- Mix a small amount of chocolate icing into the white icing to create a base tone.
- Add 5-6 drops of red food coloring to give the icing a rosier skin tone. Mix well until the color is even.
- Apply the Icing:
- Use a spatula or piping bag to layer the icing on Mario’s face, nose, chin, and ears.
- Use the icing to attach the nose, ears, and chin to the main cake.
Pro Tip: If you’re unsure about the color, test a small amount on a plate first. You can always adjust as needed.
Decorating Your Mario Cake and Fun Ideas for Grandparents
Step-by-Step Guide to a Simple Mario Cake (Continued)
Step 4: Decorate Mario’s Hat
- Cover the Hat:
- Use red icing to cover the crescent-shaped cake piece that forms Mario’s hat.
- Add the Logo:
- Use white icing to create a circle for the “M” logo.
- Spell the letter “M” with red icing inside the white circle.
Recommended Icing Tips: Use Wilton ready-to-use decorator icing for smooth, vibrant colors.
Step 5: Make the Mustache, Eyebrows, and Hair
- Pipe the Details:
- Use chocolate icing to pipe Mario’s mustache, eyebrows, and hair.
- Add white icing for the mouth.
- Outline the Features:
- Use black icing to outline the hat brim, logo, eyes, mouth, and chin.
Step 6: Add Eyes and Outline the Details
Write a “Happy Birthday” message on the board with black icing.
Create the Eyes:
Pipe a small amount of white icing in a semi-circle shape for the eyes.
Add blue icing inside the white, toward the middle of the face.
Pipe black icing inside the blue for the pupils.
Final Outlines:
Outline the hat brim and logo with black icing.
Add a chin mark and outline the eyes.
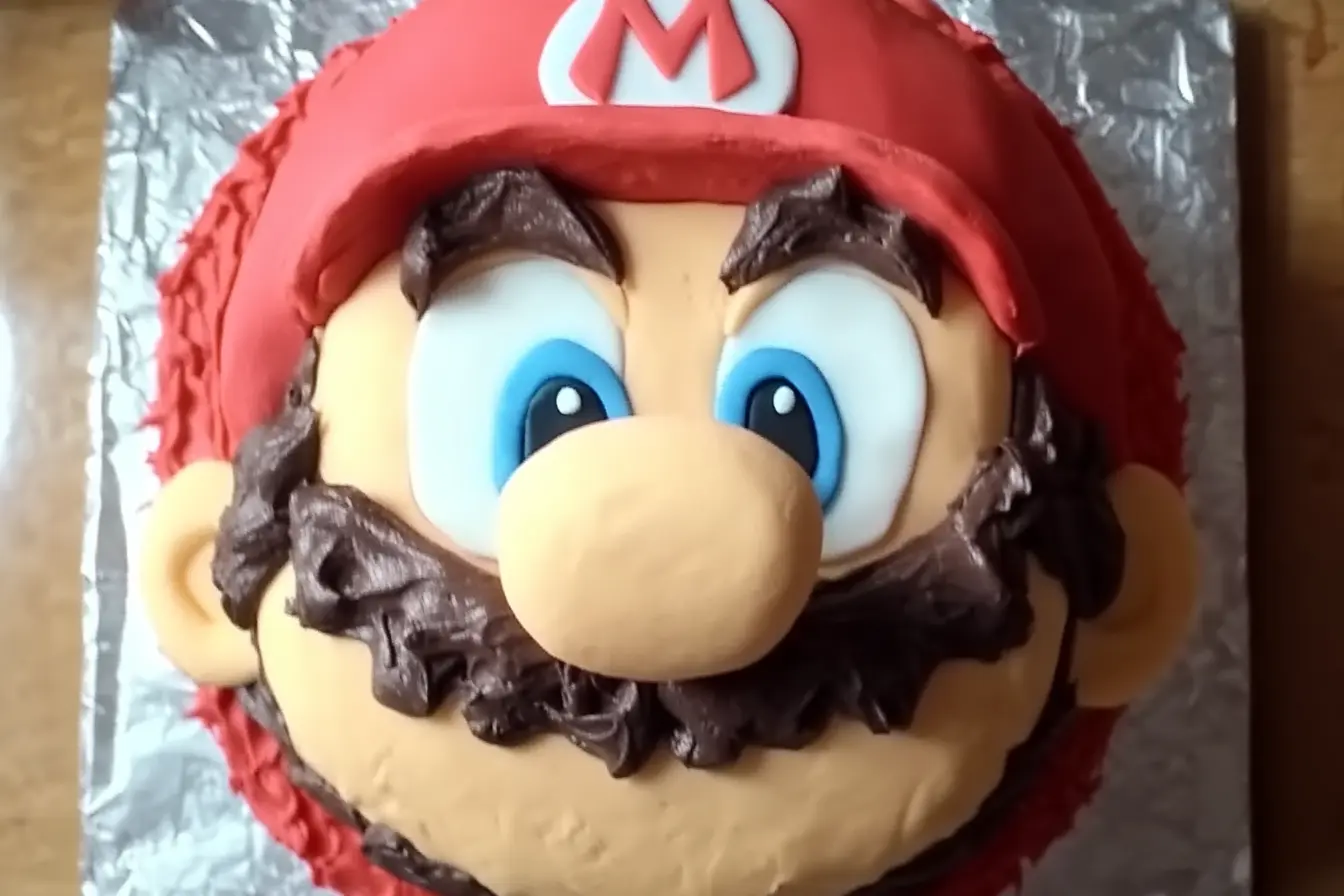
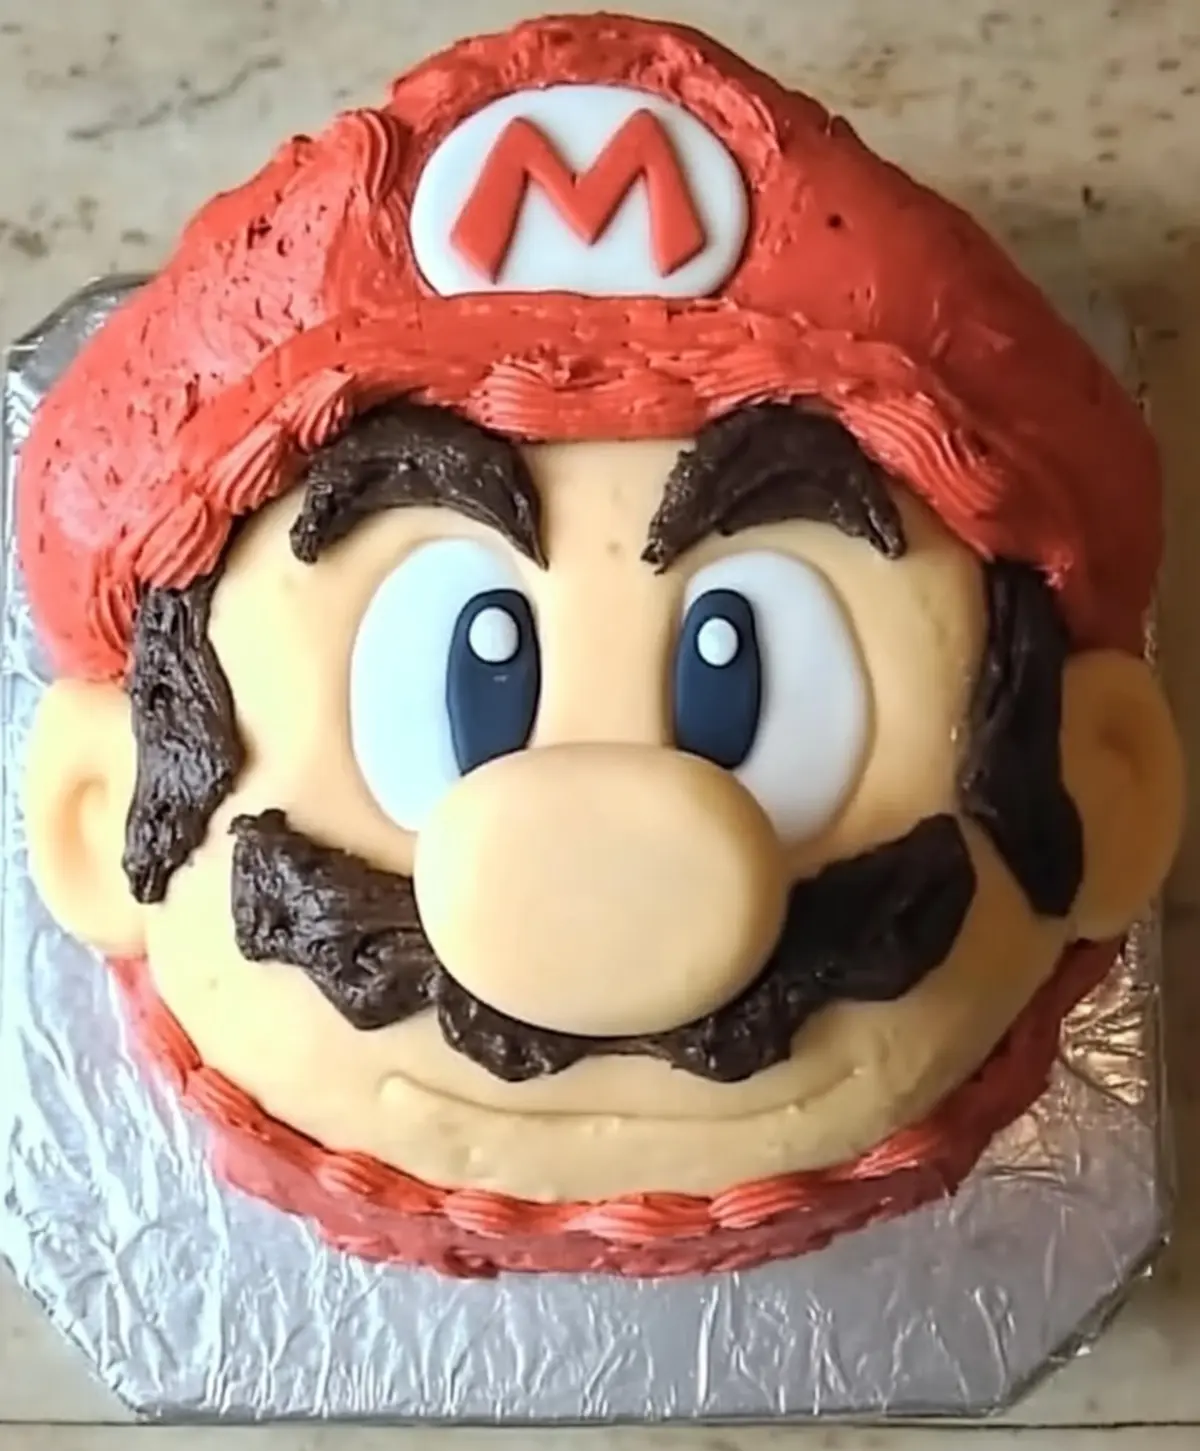
And there you have it—a simple yet adorable Mario cake that’s sure to impress!
Creative Mario Cake Ideas for Grandparents
If you’re baking for grandchildren or hosting a family gathering, here are some fun and creative ways to make your Mario cake extra special.
Easy Mario Sheet Cake for Beginners
Not comfortable with round cakes? Try a Mario-themed sheet cake instead. Here’s how:
- Bake a rectangular cake and cover it with blue icing to represent the sky.
- Use green icing to create a grassy area at the bottom.
- Add edible decorations like Mario figurines, mushrooms, or stars to complete the scene.
This design is perfect for beginners and still captures the spirit of Mario.
Using Pre-Made Decorations for a Quick Cake
If you’re short on time or want to keep things simple, pre-made decorations are a lifesaver. Here are some ideas:
- Purchase Mario-themed cake toppers online or at a party store.
- Use edible images of Mario, Luigi, or other characters.
- Add sprinkles or edible glitter for a festive touch.
These decorations make the cake look professional with minimal effort.
Adding Personal Touches
Make the cake even more special by incorporating personal elements:
- Add the birthday child’s name in icing or edible letters.
- Include their favorite Mario character, like Luigi, Princess Peach, or Yoshi.
- Use themed candles or a small toy figure as a cake topper.
These small touches show thoughtfulness and make the cake unique.
Tips for Baking with Grandchildren
Baking a Mario cake is a wonderful activity to share with grandchildren. Here’s how to make it fun and safe for everyone involved.
Fun Ways to Involve Kids in the Process
Kids love helping in the kitchen, and baking a Mario cake is no exception. Here are some tasks they can help with:
- Mixing the batter: Let them stir the ingredients (with supervision, of course).
- Adding sprinkles: Kids can decorate the cake with colorful sprinkles or edible glitter.
- Tasting the icing: A little taste test is always a hit!
Involving kids not only makes the process more enjoyable but also creates lasting memories.
Safety Tips for Baking with Little Helpers
While baking with grandchildren is fun, it’s important to keep safety in mind:
- Keep sharp tools out of reach: Use child-safe utensils whenever possible.
- Supervise closely: Always keep an eye on kids, especially near hot ovens or mixers.
- Teach kitchen hygiene: Show them how to wash their hands before handling food.
With these tips, baking together will be a safe and enjoyable experience.
FAQs and Final Thoughts on Making a Mario Cake
Frequently Asked Questions About Mario Cakes
Even with a detailed guide, you might still have some questions about making a Mario cake. Here are answers to some of the most common queries.
Can I Use a Store-Bought Cake Mix?
Absolutely! Using a store-bought cake mix is a great way to save time and simplify the process. Just follow the instructions on the box, and you’ll have a delicious cake base ready for decorating. No one will know the difference—especially when the focus is on the fun Mario design!
What’s the Easiest Way to Decorate a Mario Cake?
If you’re new to cake decorating, keep it simple:
- Use pre-made decorations like Mario-themed toppers or edible images.
- Stick to basic shapes for Mario’s face and hat.
- Use a Ziploc bag as a makeshift piping bag for clean lines.
Remember, the goal is to have fun and create something that brings joy—not to be perfect.
Are Mario Cakes Suitable for Older Adults?
Definitely! Mario cakes aren’t just for kids. They’re a nostalgic treat that can appeal to anyone who grew up with the games. Plus, baking a Mario cake is a wonderful way to connect with younger family members and share a piece of your childhood with them.
How Can I Make a Mario Cake Without Fancy Tools?
You don’t need professional baking tools to make a Mario cake. Here are some household items you can use instead:
- Ziploc bags: Snip off a corner to use as a piping bag.
- Spoons and knives: For spreading icing and adding details.
- Toothpicks: To trace designs or add fine details.
With a little creativity, you can achieve great results using what you already have at home.
What Are Some Unique Mario Cake Ideas?
If you want to take your Mario cake to the next level, try these creative ideas:
- 3D Mario Cake: Sculpt Mario’s head or a mushroom out of stacked cake layers.
- Mario Kart Cake: Decorate the cake to look like a race track, complete with edible Mario Kart figurines.
- Princess Peach Cake: Add a touch of elegance with a pink and gold cake featuring Princess Peach.
These designs are sure to impress at any celebration.
How Do You Make a Mario Cake Quickly and Easily?
For a quick and easy Mario cake:
- Use a boxed cake mix and store-bought icing.
- Decorate with pre-made toppers or edible images.
- Keep the design simple, focusing on Mario’s face and hat.
With these shortcuts, you can have a Mario cake ready in no time.
Final Thoughts: Bringing Joy with a Mario Cake
Baking a Mario cake is more than just creating a dessert—it’s about bringing people together and creating lasting memories. Whether you’re baking for a grandchild’s birthday, a family game night, or just for fun, a Mario cake is a delightful way to add a touch of nostalgia and creativity to any occasion.
Why Baking a Mario Cake Is Worth the Effort
The effort you put into making a Mario cake pays off in smiles and laughter. It’s a chance to:
- Relive fond memories of playing Mario games.
- Bond with loved ones over a shared activity.
- Create something special that will be remembered for years to come.
Even if your cake isn’t perfect, the love and care you put into it will shine through.
Encouragement for First-Time Bakers
If you’re new to baking or cake decorating, don’t be intimidated. Start with a simple design, take your time, and most importantly, have fun! Baking is a skill that improves with practice, and every cake you make is a step forward. Remember, it’s not about perfection—it’s about the joy of creating something special for the people you love.
For more easy baking recipes, check out these no-egg peanut butter cookies.
Conclusion
So, roll up your sleeves, gather your ingredients, and get ready to bake a cake that’s as fun to make as it is to eat. After all, as Mario himself would say, “Let’s-a go!”A Mario cake is more than just a dessert—it’s a celebration of nostalgia, creativity, and family. Whether you’re an experienced baker or a first-timer, this guide has everything you need to create a Mario cake that will delight your loved ones. From simple step-by-step instructions to creative ideas and practical tips, you’re now equipped to bring the magic of Mario to your kitchen
Print
How to Make a Mario Birthday Cake – A Nostalgic Treat for Family and Friends
- Total Time: 50 minutes
- Yield: 10 servings 1x
- Diet: Vegetarian
Description
This Mario Cake is a fun and nostalgic dessert, perfect for family celebrations. With simple ingredients and an easy-to-follow design, it brings joy to both bakers and gamers alike.
Ingredients
1 box Yellow Cake Mix (or your preferred flavor)
3 large eggs
1/2 cup butter (melted)
1 cup water
2 cups store-bought white icing
Red, blue, black, and chocolate food coloring
Optional: Fondant for details
Instructions
Preheat your oven to 350°F (175°C).
Prepare the batter following the cake mix instructions, using eggs, butter, and water.
Pour the batter into two 9-inch round pans and use the extra batter for three cupcakes.
Bake according to the package instructions and cool completely.
Assemble the face using one round cake for the face, the second round cake cut into a crescent shape for the hat, and the cupcakes for the nose, ears, and chin.
Mix white icing with a drop of chocolate and a few drops of red food coloring to create Mario’s skin tone.
Cover the face with skin-tone icing. Use red icing for the hat and blue, black, and chocolate icing for facial features.
Decorate with fondant for finer details if desired.
Notes
-Using a boxed cake mix saves time without compromising flavor.
-Fondant can add a polished look but is optional for beginners.
- Prep Time: 20 minutes
- Cook Time: 30 minutes
- Category: Dessert
- Method: Baking, Decorating
- Cuisine: American
Nutrition
- Serving Size: 1 slice
- Calories: 320 kcal
- Sugar: 28 g
- Sodium: 240 mg
- Fat: 12 g
- Saturated Fat: 7 g
- Unsaturated Fat: 4 g
- Trans Fat: 0 g
- Carbohydrates: 45 g
- Fiber: 1 g
- Protein: 4 g
- Cholesterol: 70 mg